Ehrlich Canadian

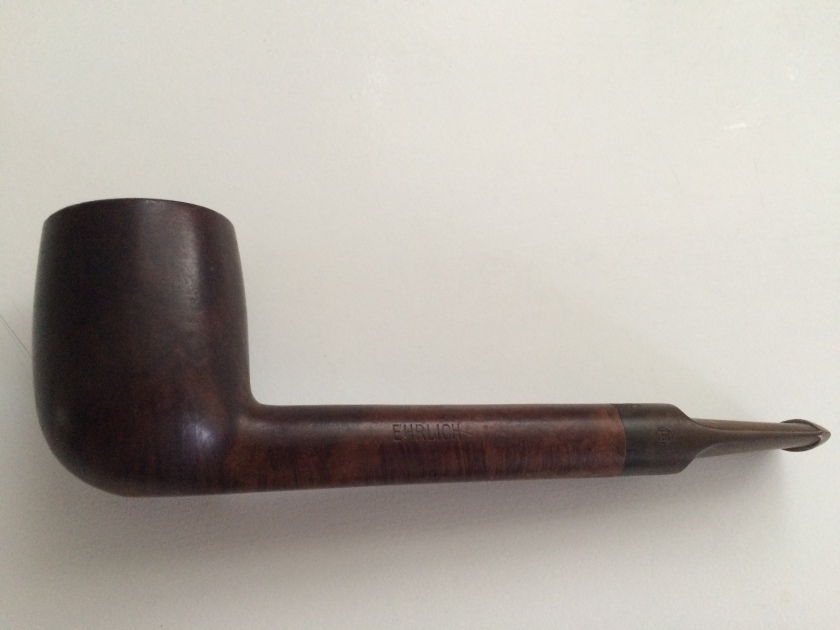
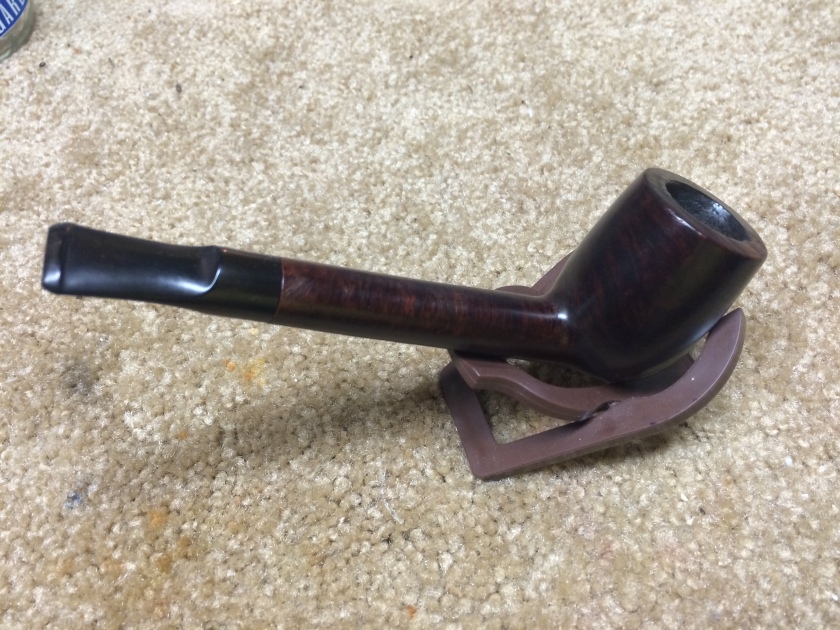
A couple of months ago I bought an Ehrilch Canadian on eBay and left it off to the side waiting for the summer temps to drop to be able to work in the garage at my bench. Now that we are back down to the 80’s I decided to get it done. It got a good ream, followed by a good retort before starting on the real work.

img_2194img_2270

img_2201img_2200

img_2272img_2271

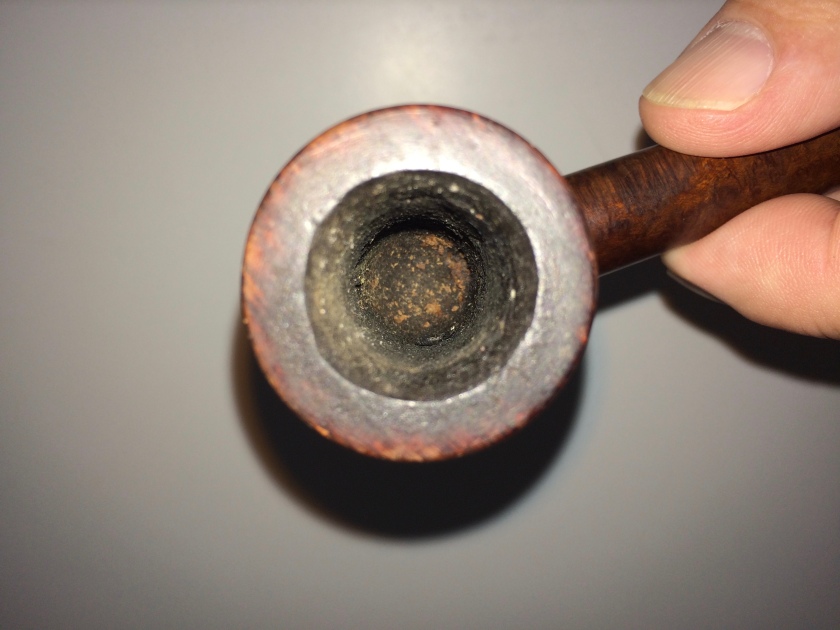
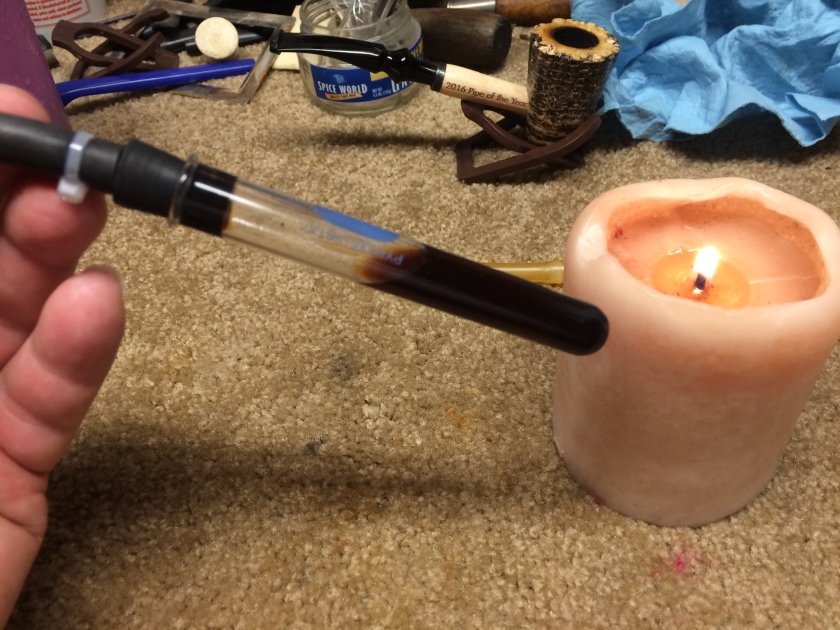
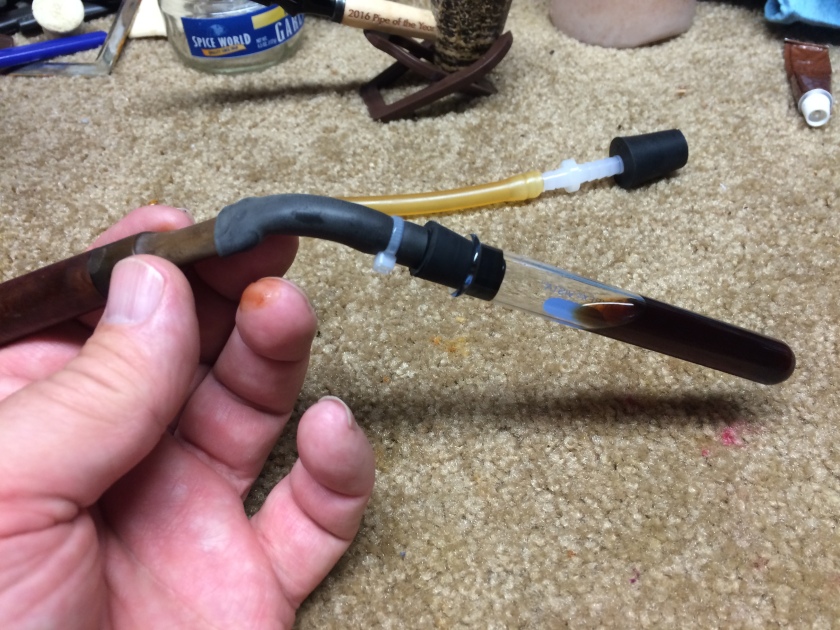
It took about six times with new ever clear each time to get it to come out clear. I then used  several clean pipe cleaners to make sure I got all I could out. Once satisfied that it was clean I then put the stem into an Oxyclean bath to loosen up the oxidization.

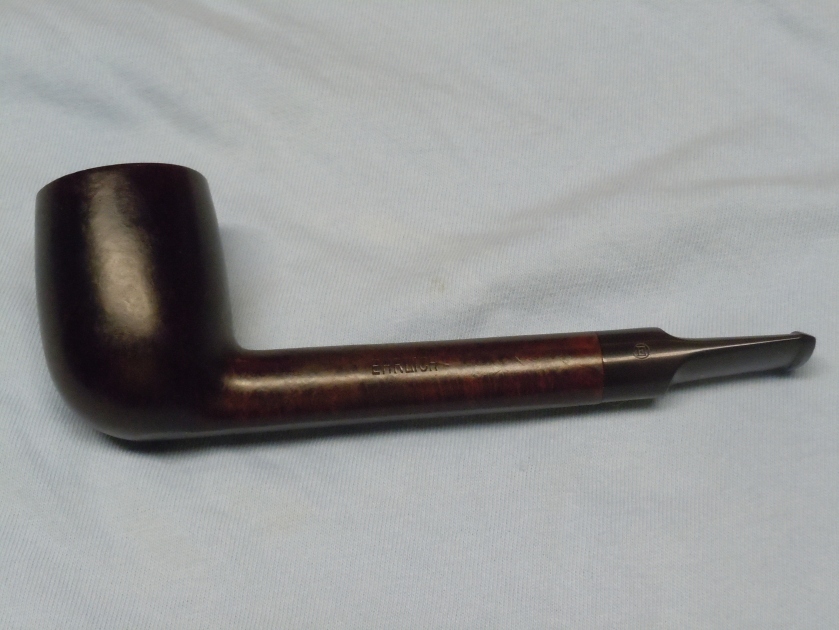
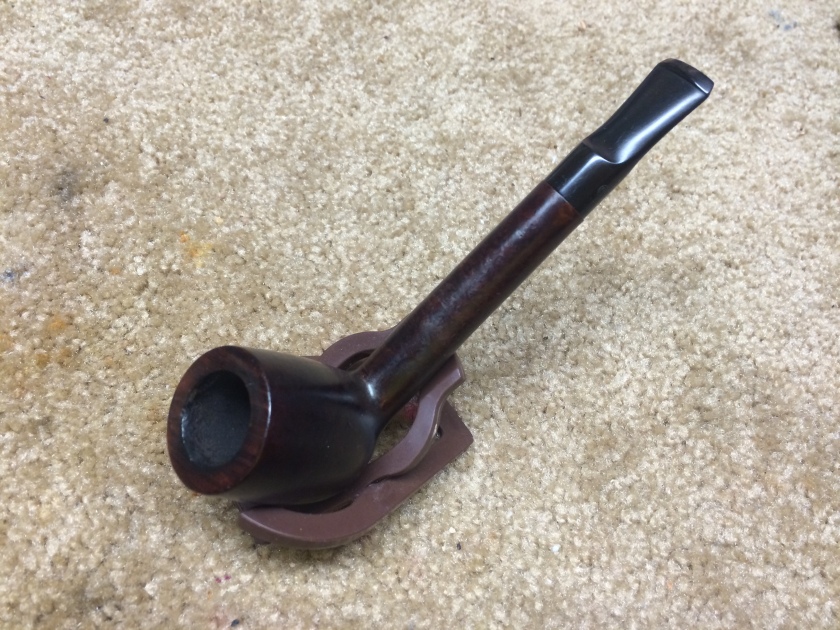
Next it was time to get into the sanding of the stem to bring it back. Using the micro sanding sponges I wet sanded from 1200-6000 grit and finished by moving through the range to the 12000 sponge and finishing up with Brebbia’s pipe and stem polish.img_2444

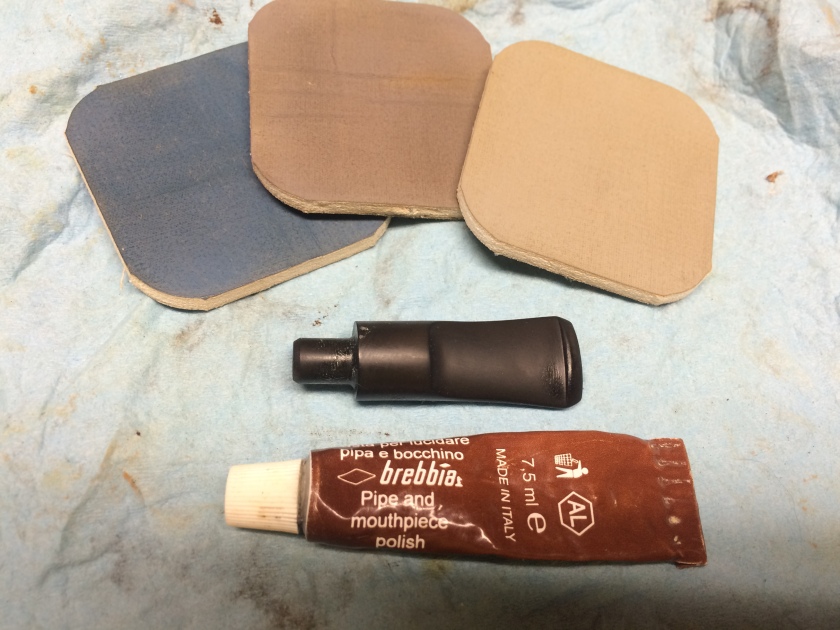
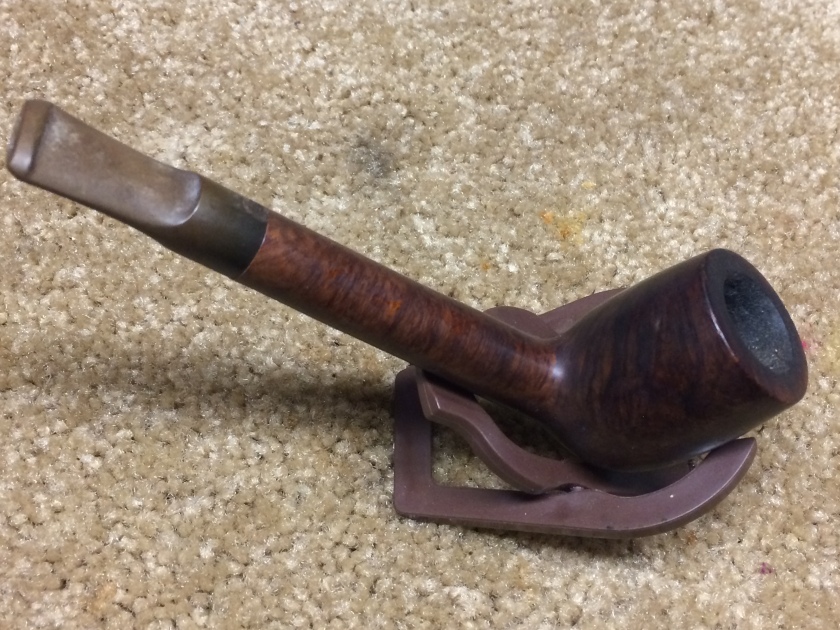
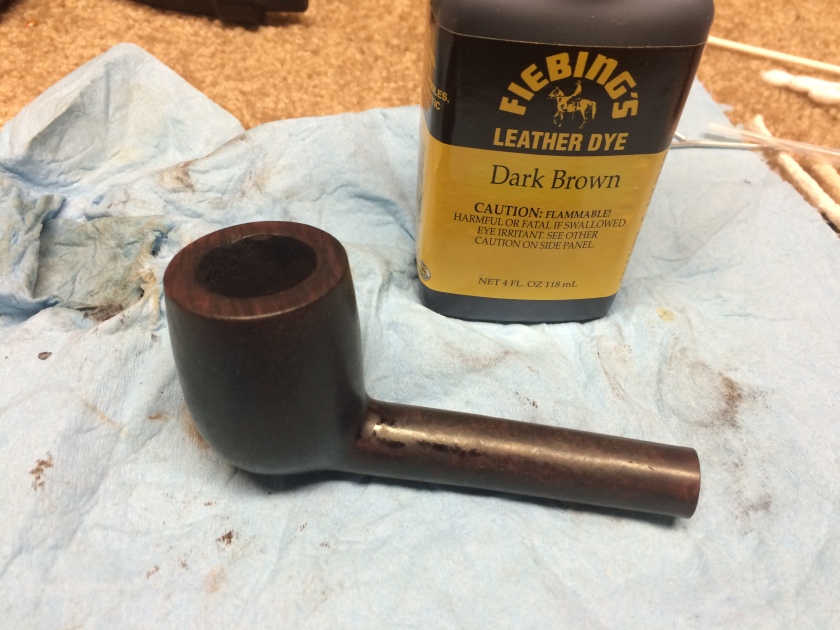
The bowl was in good shape. After a salt and alcohol bath I used everclear and several makeup pads to wipe down the bowl and assess the color to use. I wanted to stay true to the original brown, so using Fibbing’s Leather Dye in the Dark Brown color, it got several coats that was flamed to set each time. Once satisfied with the color it was on to the buffer to complete the look.

img_2436img_2435


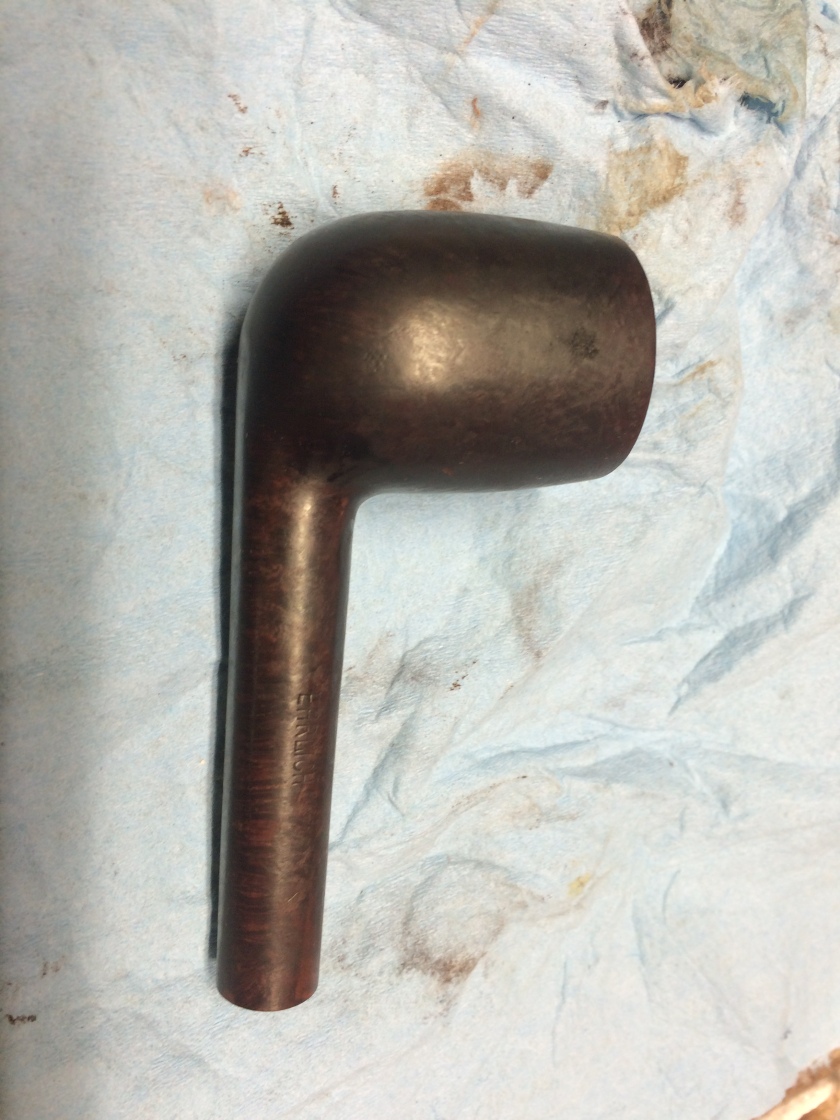
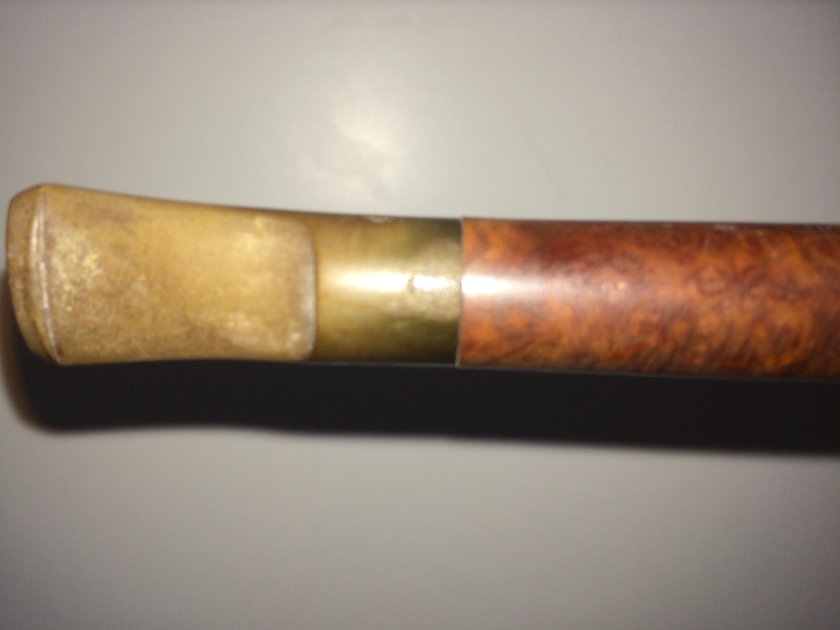
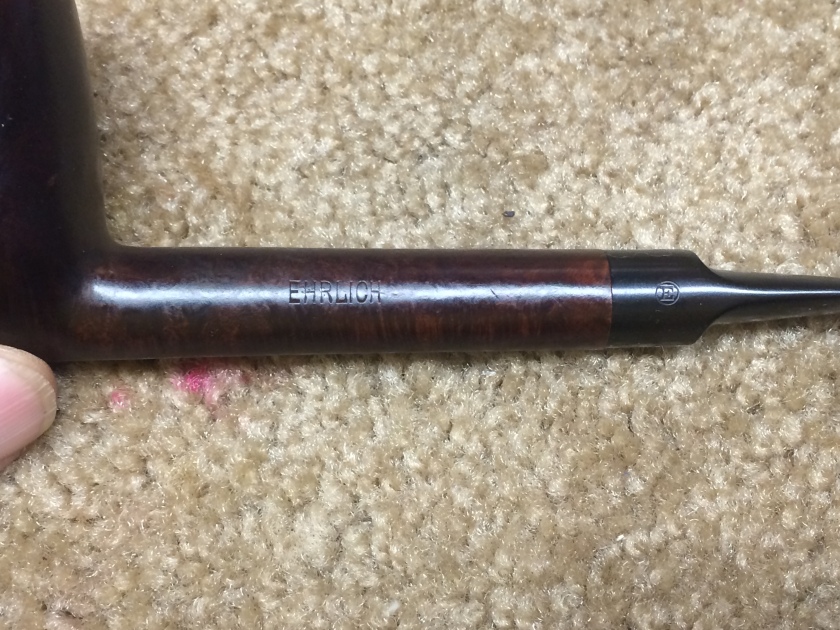
It’s a little bit hard to date this pipe. In looking a pipephil.com and pipedia.com I wound up more confused than educated. The stem is stamped with the E in a circle and just the name Ehrlich on the left side of the shank. Having seen a number of them in the forums I wanted to make sure to do this one proud!

Thanks for looking.

dscn0916img_2449img_2447img_2446

Real Amber WDC

I recently found this little jewel on eBay.   It was listed as a French Briar, but it had a unique charm to it that no one else seemed to see. I got it for not even a song, just a clearing of the throat.

It came with this case which also needs attention. The case was marked with French Briar inside which, while it fits the pipe I don’t think came with the pipe originally.

The top of the rim had what appeared to be mold on it. Inside was not too bad as there was hardly any cake built up in it. The stem has nicks in it and the brass / gold sleeve was very dirty.

I gave the stem a bath in the Oxyclean for a couple of hours and the bowl after reaming with my Castleford reamer set of the lower three sizes, an alcohol bath over night. The Oxyclean did a great job of removing the tar and stains from the inside and outsides of the stem.  The texture of the stem was rough. I had hoped to bring it up by sanding it first then buffing it. I saw the real amber structure come alive as I attempted to polish the amber with sanding sponges from 1200 to 6000 grits. Under a magnifying glass I could see very small bubbles and imperfections in the amber. As I sanded these imperfections were exposed and became open divots, though  small, visible on the stem. As I was able to completely clean the inside of the stem I decided to just try to put some shine on the outside by using the buffing wheel. This worked very well and put a good shine to it.

The white specks are the opened bubbles. Not wanting to deteriorate the condition further I settled for the polishing wheel.

Next up was to clean out the bowl. I was happy to see that the spot that looked like mold disappeared after the alcohol bath. Using an old tooth brush I went over it with more alcohol and was able to remove all of the grime that the bath loosened and clear the grooves. They are very crisp all the way around. While the surface of the pipe is very good there is an underlying dark area round the front that looked like it was deep within the briar. When the bowl was wet it showed some very nice birdseye on one side and flame grain on the other.  Leaving it alone I let it dry, then using OxBlood Red leather stain gave it several coats and flamed it to set.

I gave it a coat of beeswax and a buff.

In researching the Real Amber WDC connection I was able to find an identical shank sleeve on a straight Real Amber WDC that they dated at 1890. I would like to believe that this is one from the same time but before I claim it I will continue to research the dating wherever I can.

Savinelli Punto Oro Poker Cleanup

A friend of mine had me Reserect another of his old pipes and this one is similar to one of the last I did for him, a Savinelli Punto Oro poker. This, he said, was his favorite pipe and by the condition it was in I would agree. it was the most smoked of the four by far.

In looking at the chip in the rim I had the thought to try to taper the rest of the rim. But, after I reamed it out I found a slight crack that I worried may effect the integrity of the pipe if I removed material near it. The stem had several very deep tooth  marks in both the top and bottom of the stem that I have not attempted to work on before and was unsure as to the outcome.

I did ask Steve Laug of Reborn Pipes how to best approach this. Thanks Steve for the advise. He suggested that I use a small heat source such as a lighter to gently raise the divots and not to get it too hot as to melt the vulcanite. Well… That part scared me so I delayed in getting this done (I was asked in May to do this…). I did not want to ruin a friends pipe!

Next  thing I did was to finish cleaning the bowl and stem. I soaked the stem in a mild Oxyclean solution and used Everclear and pipe cleaners on the stem to complete the cleaning. The bowl was given an alcohol and salt bath for about 2 hours and the outside was washed with alcohol and cotton to clean the grime off.

The next thing I needed to overcome my fear of the flame and get the tooth marks out of the stem. I inserted a pipe cleaner into it and held a flame briefly under it. Several of the divots raised a good bit. Not wanting to risk damage to the vulcanite I stopped and sanded with sponges from 1200 to 12000 grit.

I used beeswax on the bowl and Brebbia pipe and stem cleaner on the stem to bring up the shine. Then using a flannel rag I polished the entire pipe.

GBD Tapestry 9438 K

This is my latest eBay buy.

You can see that this is in need of more of a good cleaning than a reserection. The bowl is in good shape and the stem, while very oxidized, has no major dents or scrapes and the emblem is in good shape as well.

First up was to ream the bowl and give it an alcohol cleaning with pipe cleaners and Everclear. The stem I inspected and covered the logo with Vaseline to soak in an Oxyclean / water solution to loosen the oxidation. The next step was to immerse the bowl in isopropyl alcohol and let it soak for a couple of hours. When I took it out it went into a rice container to help dry it. The rice will pull out the moisture and dry it nicely. This is a trick electronics techs use when they get wet and you want to make sure it is dry before you power it up. Good to know if you drop a cell phone in water. When doing a salt and alcohol bath the rice also allows me to sit the bowl at the best angle to maximize the alcohol and not have it leak out.

The next several pictures show the progress on the stem, bringing it back to a nice shine. Starting with 220 grit flexible sandpaper and moving through the entire range of sponges up to 12000 grit you can see the finish come back. I used care not to get too close to the logo and damage it. I needed to use the pick to clear out some stubborn tar out of the bit.

I was thinking how I might give this a nice contrast to go with the finish contrast. I used the sanding sponges on the smooth areas that have geometric shapes. On the rusticated area I went with Black leather dye. I have long admired this combination in a number of pipe makers offerings. I still need to work on my technique to get the lines cleaner.

As I continue to learn more and more via experience I am encouraged by reading the blogs of Steve Laug and Upshallfan to see how veterans approach their work. A contributor to Reborn Pipes, Troy, has shown that you can be daring in reworking a pipe and get great results. Thanks to you all for the fine work you post.

Peterson XL90s Shamrock Filter / BC

The first thing I need to say is –

“Put the knife down and step away from the pipe!!”

I got this on eBay recently and was dubious of the buy but got it cheap enough. It has a stem with the letters BC in a plastic / lexan insert in it. In looking up the BC it resembles the Butz – Choquin style. The fit is good and it has a 9mm filter inside. The nomenclature on the pipe is in good shape and says Peterson XL90s on the right and Shamrock filter on the left. The stem had a very rough texture to it, like it had been sand blasted. It wasn’t scratched as in sanding, just raised material that was very dull in color.

The reason for the first comment was that a prior owner had left knife marks in the cake. A reamer was a foreign tool to the pipe. The front of the bowl is now thinner than the rest and showed sign as if it had been burned / charred like a hot spot would leave behind. Once I reamed it I verified it was scorched. There is also a small gouge in the front of the bowl as well from the knife. It seems that the knife assassin would only clean the cake from the front half of the bowl causing the damage.

IMG_1215 IMG_1214IMG_1213IMG_1210

Using the Castleford reamer I began with the third largest size and then the largest to clean the balance of the cake out. The front wall of the bowl has a dime size scorch mark that does not seem to extend too deep. So I am going to leave it alone at this time. While I was reaming and cleaning the bowl I put the stem into a Oxyclean bath to clean it. In the shank of the bowl the tar was very thick so I gave the entire bowl a bath in alcohol overnight to loosen  it up. This helped clear the tar out nicely but left the bowl bleached almost white. The stem was sanded with sponges of progressive grits from 1200 to 12000. It brought up the shine nicely.

IMG_1245 IMG_1246

In the top picture you can see the char mark in the bowl. I decided to top the bowl to minimize the back side gouge which looked as if someone used a file on it causing a drop in the rim. Using a hard flat table top and some 120 grit sandpaper I took off a good bit of material and took a small scrap of used sandpaper to chamfer the inside edge. Afterwards I used the entire range of sanding sponges once again to go over the bowl prior to staining it. The back side of the rim was severely angled and I was not able to get the full cut out without taking the bowl depth down too much.

At first I was going to use a base of dark brown and lighten that up and go over it with ox blood. But, once I covered it with the brown and flamed it, the color was too rich to alter. It came out like old leather which is a weakness for me, so it was left alone.

IMG_1250IMG_1254

IMG_1256IMG_1249

At some point I will get the correct stem for it with the Peterson logo, but, for now it should function just fine.

A final request to all pipe smokers… If you need to clean a pipe and don’t have a reamer, PLEASE find a fellow piper that can help you save your pipe for many more years of good service!

Dr. Grabow Royal Duke Straight Smooth

In a batch of bowls I bought on eBay was this smooth Dr. Grabow Royal Duke.

I started this Reserection back in July, but kept getting sidetracked and not getting it done. The finish and bowl were in real good shape. There was only one small fill on it.

First thing was to ream it with my Castleford reamer starting with the smallest and working up till I was just touching the bare wood, not wanting to go into it. Next was to give it an alcohol bath inside and out to clean out the prior owners remnants.

After the dusting and cleaning I had to make a stem for it.

Using the PIMCO Tenon Tool I cut the stem down to get a close fit and hand sanded it the rest of the way to make it complete.

First using emory paper and then working throughout the micro sanding sponges from 1200 to 12000 grit. This stem had a very large diameter and had to be brought down with the Dremal tool to get to the right size. I have a LOT to learn about how to do this step correctly to maintain the flow of the lines. While this was a functional success it leaves a lot to be desired in the best form category. Practice should improve this part of my education.

After the alcohol bath I used Oxblood Red stain to restain the bowl. I flamed it to set it and then took it to the buffer to bring up the shine.

I would put this in the ugly pipe category but, it should smoke ok for a long time to come.

Kaywoodie Drinkless Bent

Recently I won a pair of Kaywoodie Bents on eBay. When they  arrived they were in pretty good shape. Here is the first Reserection of the pair.


I gave it a light ream with my Castelford ream set followed by a nice alcohol cleaning and cleaned the rim with some saliva and alcohol. The stem had some chatter at the bit and I sanded it out with wet pads from 1200-4000 grit and dry sanded it through 12000 grit.

Using a black stain I redid the rusticated areas and then with a dark brown stain I went over the rest of the bowl. Lastly I gave it a ride on the buffing wheel and used some Brebbia Stem Polish on the stem to bring it back up.


GBD New Standard 9442 Cleanup

Recently I bought a GBD New Standard 9442 on eBay in which the seller said had been “professionally” cleaned. The photos online looked ok and I bid on the pipe. Upon receipt I was disappointed in the condition. It would not even pass a pipe cleaner.

There was a lot of tar built up in the base of the pipe and the stem was plugged solid. I went through a number of pipe cleaners and cotton swabs to get it cleaned.

The stem had a couple of tooth marks and a crack in the bottom of the stem. Using the black super glue I tried to fill the tooth marks and repair the crack.

This is an area that I will need much more practice in before I can say it’s good. At this writing the repair I made are primitive but ok. I will continue to practice…

I soaked the stem in oxyclean and again in alcohol to get the deep oxidation loose. Then using wet sanding from the 1200 – 4000 micro pads and then going up to 12000.

Obsidian oil was used to make the final stem polish. Once it dried I took it to the wheel and buffed it.

Dr. Grabow Royal Duke Re-Stemmed and Reserected!

I was finally able to complete the restem of the Royal Duke I have been working on for some time now. I bought it on eBay as part of a group of no stemmed, in need of care, bowls. 
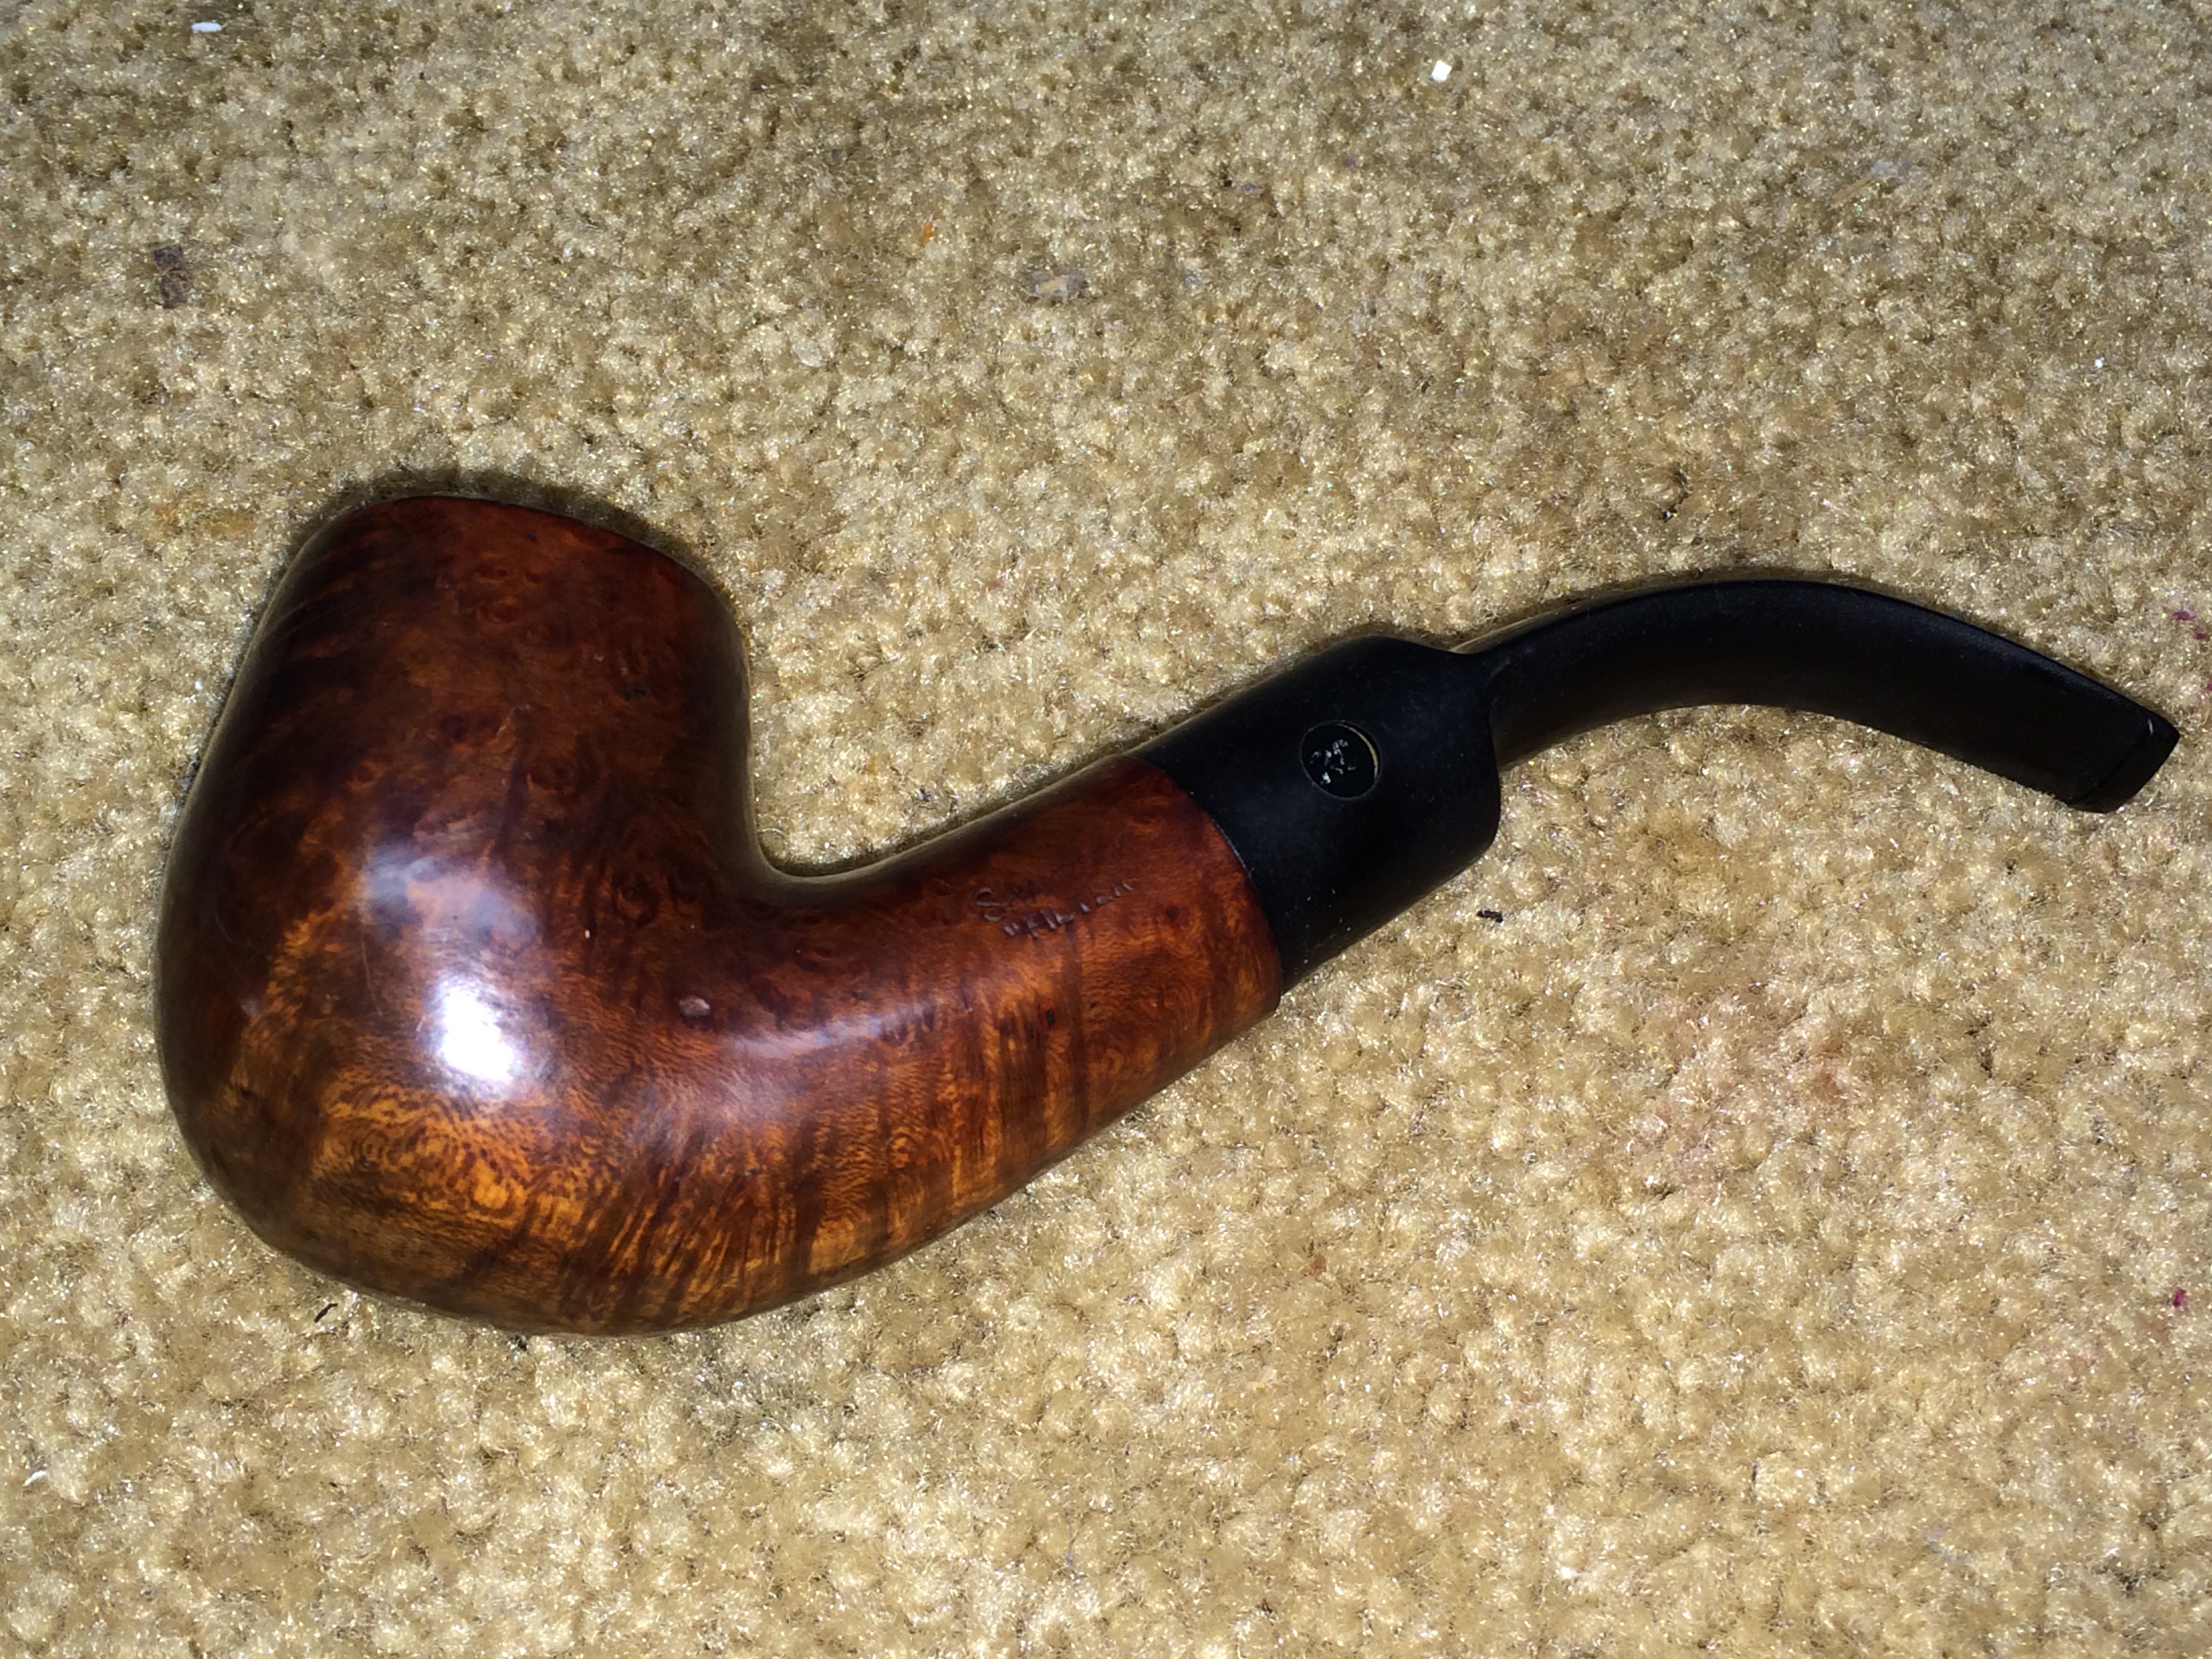
The over all condition was not too bad. So I gave it a good ream,  clean and salt / alcohol bath. The stem selected was a new vulcanite that was too big all around. So using the PIMO tenon and Dremel tools was able to get the size and shape I needed. Next up was to hand sand with the micro sponges at first I used the 1200-4000 with water to wet sand. Then after the stem dried I used the same three pads dry and went up to 12000 grit to get as much of a shine as I could. Finally using Brebbia Stem Polish and a nice fleece rag was able to get a nice shine to both the bowl and stem.

London Hall Supreme

A while ago I bought this Dublin shaped bowl from eBay. It was in good shape and just needed a stem and good cleaning for it to resume service.

The bowl did not have much cake built up like it was rarely used. So I just gave it a light brushing out and a course of salt and alcohol and pipe cleaners in the shank. There was a slight burn on the top which I wiped with alcohol and soft cloth. One thing it did have was a fine threaded insert in the shank. I removed it before I began to work on it.

I selected an oval stem to replace the missing one and turned it to fit with the PIMO tenon tool. I’m still trying to master this and believe I now have at least a basic understanding of it.

Once the stem was fit I added a little color to the bowl by using a Dark Brown stain to it. After applying the stain I flamed it to set it and then wiped it down with alcohol to get to the desired richness.

The grain of the bowl is very nice and I did not want to hide it. There are no visible fills or defects in it and has a great character to it.

I then polished the stem with sanding sponges beginning with the 1200 to 4000 grits with water and then dry sanding the 6000 to 12000 grits. I followed this with Brebbia’s Pipe and Stem Polish to get the shine up.

When the bowl was ready I took it to the wheel and polished it with white diamond and then wax, added the stem and was very happy with the results.

After I posted this it was suggested that I put a bend in the stem. I have not done this before and had to get the idea settled first. I did some research to see how to do it.

I went to the Reborn pipes blog and found the method to use and it worked very well.

I took the stem and inserted a pipe cleaner into it. I used my paint removing heat gun to heat the stem evenly.


After I heated the stem I used my bottle of everclear to roll the stem over it to get the shape.


I just put a slight bend in the stem.

Thanks to Steve at Reborn Pipes for the suggestion and instructions on how to get this done.